SAR Class-J
miniThrottle: A model railroad WiFi throttle.
History
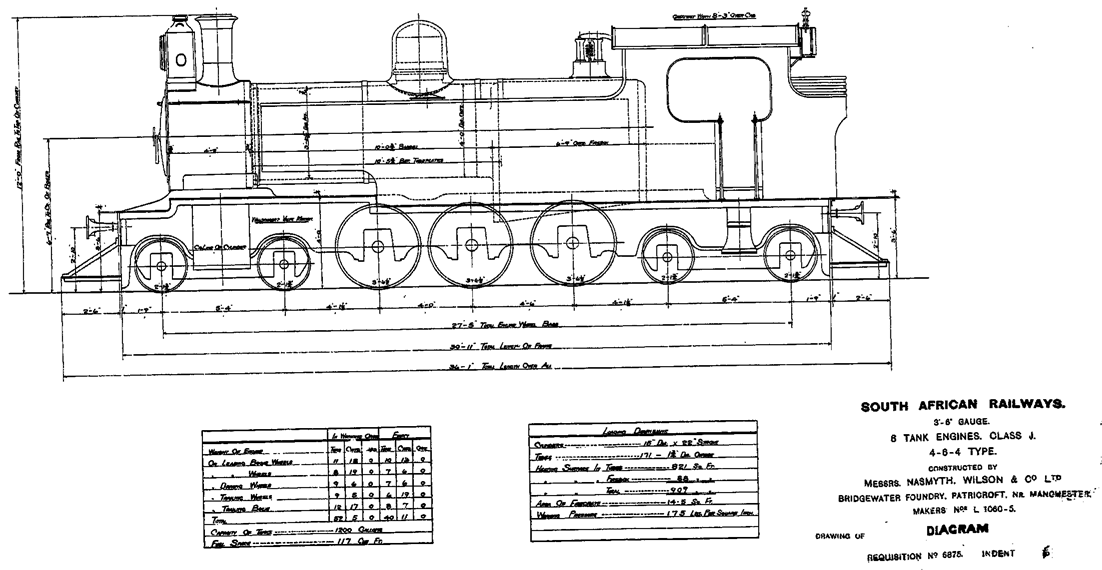
The Class-J locomotive entered service with the South African Railways (SAR) in 1915 and was intended to work the traffic on the Natal South-Coast line. The ability to run in equally well in both forward and reverse was a consideration as this line had limited turning facilities. 6 engines of this type were built. Due to increasing loads and only having 15,200 lbs tractive effort at 75% boiler Pressure (175psi) they were later relegated to shunting service at Durban harbour. The last SAR service they performed was in the Cape Midlands system and withdrawn from service in 1957. Two were sold to East Daggafontein mine in Springs (East Rand).
After mine service one engine was (Nr 341) was preserved at SANRASM in Chamdor near Krugersdorp. Unfortunately it was so badly plundered by free-range scrap metal merchants, that it was scrapped in 2010.
Modelling
Modelling a 3'6" gauge locomotive on HO track at 1:80 or 1:87 scale is going to be an issue. 3' 6" gauge at 1:87 scale would be 12.3mm gauge. Standard HO track is spaced at 16.5mm, or 1.44m (4'8") at 1:87. That is OK for European or US trains but requires some distortion compromises at 1:87. It may be less noticable if building large engines like a class 15F or class 25 condensing locomotive. Otherwise, 1:64 may be easier. But then it probaly needs a dedicated layout or it will be display only. By opting for 1:87 ready to run rolling stock can be used, and there are many club layouts at 1:87.
My choice for this build is a SAR Class-J, which in prototype at 34' over buffers is only slightly smaller than the Class-B at 34' 8" over buffers. However, this should be a slightly easier build as it has inside frames and does not have the corrugated iron roof of the Class-B. So then, how does this size up?
| Dimension | Prototype | Metric | 1:87 | 1:80 |
|---|---|---|---|---|
| Length over buffers | 34' 0.75" | 10.38m | 119.3mm | 129.8mm |
| Length over wheelbase | 27' 5" | 8.36m | 96.1mm | 104.5mm |
| Driving wheel diameter | 3' 6.75" | 1.09m | 12.4mm | 13.5mm |
| Lead/trailing wheel diameter | 2' 1.75" | 0.657m | 7.6mm | 8.2mm |
| Height from rail | 12' | 3.66m | 42.1mm | 45.8mm |
| Height from rail to centre boiler | 6' 9" | 2.06m | 23.6mm | 25.7mm |
I've no timeline for my build. If it takes 5 years to build, so be it. This is a bit like building a sailing ship inside a bottle. The build is a goal as much is the end result. The project itself is likely to raise technical challenges as it proceeds. Some things may need redoing or experimenting with.
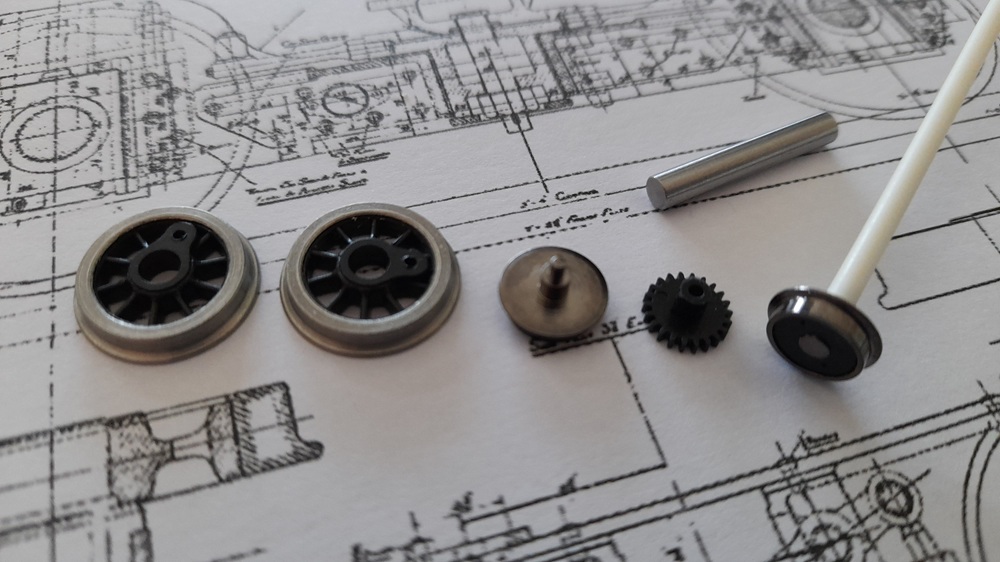
Most models' running performance is largely due to a good chassis. So that is where my build will start. Challenges here include having wheels that are on the smaller diameter of what is commercially available. And I'm not game to make my own wheels. I would like to include a Continuous Springy Beam (CSB) suspension too. And of course DCC control with working headlamps. My intent is to update this page as I go along.
Initial Parts Orders
Before continuing, I wanted to ensure I had the essential parts to make up the engine. With that in mind:
- Suspension, motor, and gear box: High Level Kits
- Motor: 1020FE Iron Core
- GearBox: RoadRunner Plus Gearbox
- Hornblock: 3 pairs of Standard hornblock & Carrier tag
- Tools: CSB jig
- Main driving wheels: Alan Gibson Workshop
- Driving wheels: 3 pairs of 10 spoke 13mm (code 4839G)
- Crankpin set (code 4M42)
- Short handrail knobs (code 4M53)
- Misc parts: m1 screws (code 4M43), bushes (code 4M44), flanged nuts (code 4M46)
- Lead and trailing wheels: Hobby Search (Japan) - N scale page
- 0687 Locomotive wheel (black, dia 7.6 w/Plate wheel center and gear) - Model train N
- DCC Control: LaisDcc via AliExpress
- 21PIN MTC Adapter Board 21MTC to 21 Wires Converter 860008
- 21PIN MTC Decoder 6 Function HO Scale Model Railway Trains 870019
The leading and trailing wheels are N-Scale wheels and thus are suited to 9mm gauge. However, the wheel pairs are joined by a short plastic tube (2.4mm or 3/32inch diameter) section with a cog. These can be separated by twisting the wheels off from the black tube section. The wheel width is 2mm, has a 2mm axle and a 2mm pin. The axle should fit nicely into a brass frame, but the centre of the bogie needs to be made of plastic to ensure electrical isolation of the rails. While styrene may be quite flexible, my intial thoughts are to re-connect port and starboard wheels with a styrene tube at a length suited to 16.5 mm gauge.
I've not used LaisDCC decoders before, and they appeared as an inexpensive option. However, after adding postage etc on them, maybe they are not quite as inexpensive as I first bargained on.
| Thank you for visiting camelthorn.cloud | Home |