Monitoring the environment using HydraFerret and xymon
Introduction
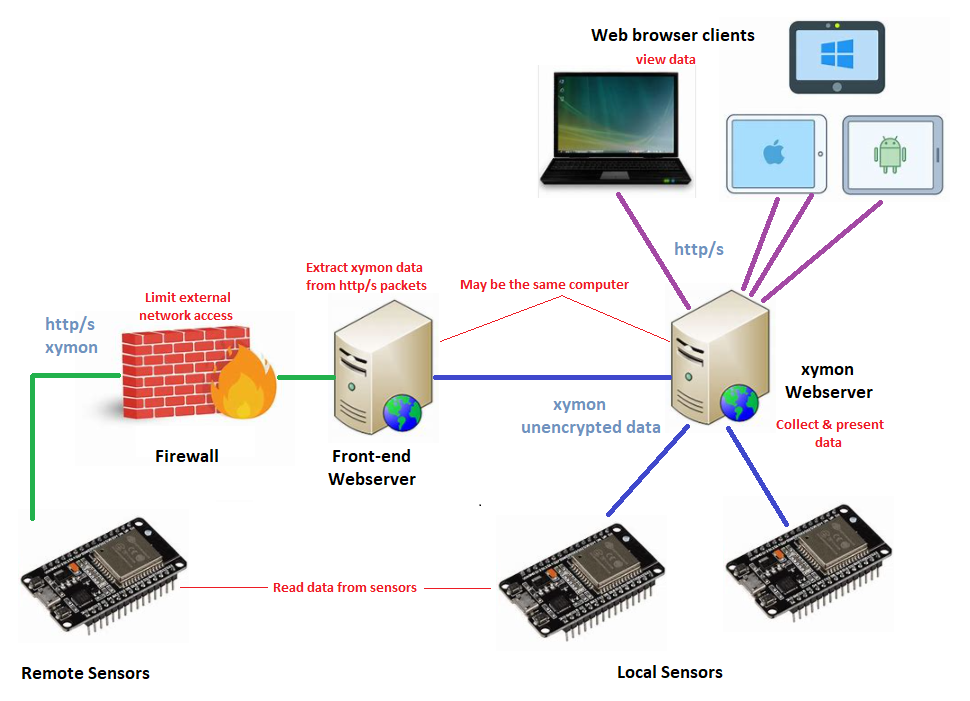
HydraFerret allows the collection of environmental data to be collected relatively easily. The collection is made using inexpensive IOT (Internet/Intranet Of Things) sensors and processors, collects their data centrally and displays it using xymon. Xymon is better known as a computer monitoring and alerting tool, but its simple interface and extendable agent features lend well to this type of collection. Data is collected in graphs which default to 2, 12, 48, and 576 day graphs. Warning and Critical thresholds can be set for when readings are outside preset parameters.
Multiple sensors can feed into one HydraFerret module. Multiple HydraFerret modules can feed in to one server which runs xymon to collect and present data. Xymon is available as a standard operating system package in some Linux flavours such as Ubuntu. Some minor configuration is required on the xymon side, to group HydraFerret modules into logical groups and define the graphs to be presented. Each HydraFerret module also requires some configuration to name it, connect to WiFi, define I/O usage. Optionally warning and critical alerts can be configured on each HydraFerret module for any sensor. Data from HydraFerret is sent to xymon in plain text or using http/s.
User interface
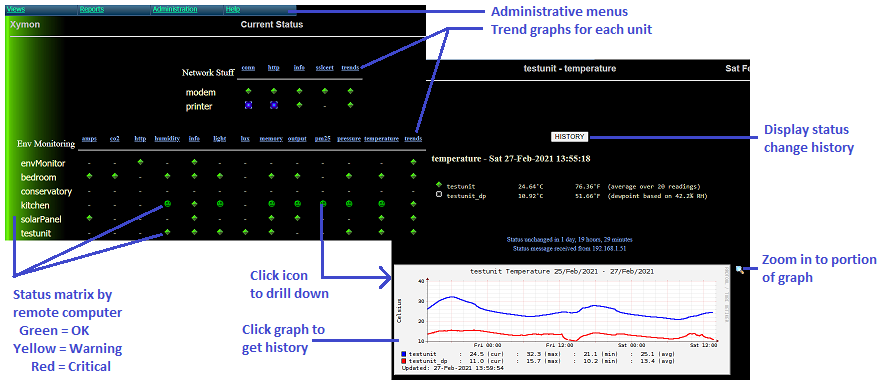
The xymon web interface is used as the user interface. This presents a two dimensional grid of computers (or esp monitoring units) and the datacollected or tests they've run. A status icon shows the state of the test where green is OK, yellow a warning, red a critical state, purple for missing data and clear for no data received. By clicking on this status icon you can drill down into detail to see the current state and recent history of the measurement. From here it is possible to zoom in detail or to view longer trends
Collection Configuration
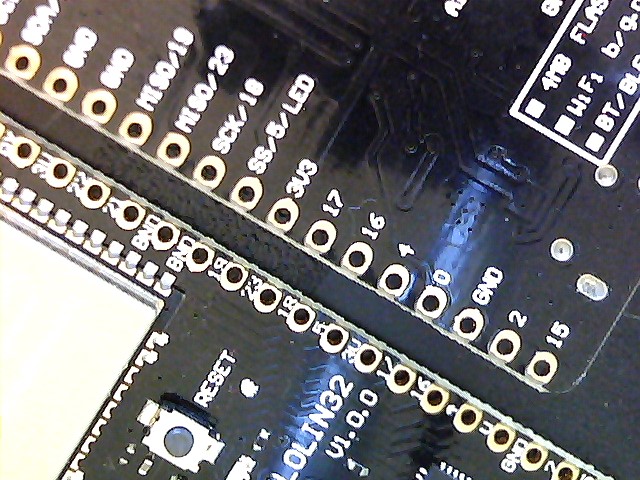
Each collection unit consists of an ESP32 computer and several sensors. The configuration of the unit is via a command line interface over a serial port (115200 bits/second, 8 bit, no parity, 1 stop bit). Telnet access is also supported once WiFi has been configured. This allows pins to be assigned to the collection of data, where this may include:
- <=8 Counters: eg from magnetic hall effect flow sensors or light beam pedestrian counters.
- <=8 ADC (Analog to digital) sensors, such as soil moisture sensors.
- <=2 I2C busses supporting various devices such as temperature and light sensors. On booting these busses are scanned for devices which minimises set up and allowing for a degree of "plug and play".
- <=4 Onewire busses supporting temperature sensors.
- <=8 Outputs to trigger relays or perform internal actions such as reboots or firmware updates.
Alerting and output control is done using a rpn calculator which has access to many variables related to sensors and time. Each sensor (even ones of the same type) can be set to have different alerting thresholds. This approach differs a bit from the idea of centralising alerting thresholds using xymon. However, it offers great flexibility. For example, if measuring room temperature with a 20 degree target and chillers with a target temperature of 5 degrees Centigrade and freezers with a target of -20 centigrade, individual thresholds can be configured.
Cost of set up
there are 2 costs of set up to consider: financial cost and human effort. Both of these can be kept low, although more more processor, more storage etc can always be added. A typical configuration consists of a single sever and one or more ESP32 based data collection nodes. Each data collection node may have one or more sensors. Sensor costs vary from sensor type and supplier.
We'll look at what some "bare-bones" costs might look like:
| Effort | |
|---|---|
| Initial server setup | 1 hour |
| Configure web sever & xymon | 0.5 hour |
| Install initial HydraFerret to ESP32 | 0.5 hour |
| Install additional HydraFerret units | 5 mins |
| wire up sensors per unit on prototype board | 5 - 30 mins |
| Financial Cost | |
| ESP32 processor + hdc1080 + prototype board | 10 USD |
| AWS Free Tier server for one year | 0 USD |
| OR Oracle Cloud Always Free | 0 USD |
| OR Raspberry PI server | 100 USD |
As can be seen costs can be very variable, but should be low enough to allow many people to experiment with IOT technology. There is no sale-ready box-kit for HydraFerret, but it can be built from readily available and generally inexpensive modules. The main variants around expense can be:
- Research Required: The amount of time required to research various things such as where to buy components, how to configure servers or decide if HydraFerret will meet your needs is a personal journey and we can't guide you on how much (or little) effort you'll want for this.
- Your experience: This applies to the effort required and is related to the previous point. If you have IT or electronics experience, it will be easier and quicker than for someone without that background. Conversely if you have to research everything before doing it, it will take a lot longer.
- Installation size: It will take much less expense to set up one or two IOT sensor units than it would a thousand.
- Server infrastructure: It will cost more to have a server that is not a "free tier" server, than say a rack mount unit in your data centre.
- Incidental Items: The cost above does not show the cost of power adapters for HydraFerret units, as you could choose from multiple power sources. For some users they will have easily accessed USB ports, or 12v (solar/vehicle/vessel) power. Others will need to buy power adapters for each unit. Also consider the expense of a box or case to house the HydraFerret electronics. This will vary with box size, material, weather/dust-tightness, and munufacturer/reseller of the box. Other variables include wiring, grommets, nuts, bolts, mountings (for box, sensor, processors, cable ties or cable ducts).
Installation
Installation consists of several steps, the basic ones being:
| Thank you for visiting camelthorn.cloud | Home |